
Monday, July 11, 2011
Nails

Window Mirror
As discussed previously, I inherited a tendency to pick up "treasures" that other people might refer to as "trash." Several years ago, a few windows were picked up, by me or my mom or somebody -- I don't remember. Anyway, I've had them, and I've had various half-formed ideas about what to do with them.

I decided it was finally time to do something, and I discovered this paint spray that creates a mirror-like surface. (And in case you haven't noticed, I'm really into spray paint right now.)

I forgot to take pictures of my progress, but you spray the paint on the opposite side of the glass that is going to be the "mirror," and once the several coats have dried, it looks like an old mirror. I sanded the surface and painted it. I decided not to tape -- I scraped instead. I find razoring off the paint to be oddly enjoyable. You probably can't tell, but the window mechanism at the top is spray painted silver, like my kitchen hardware.


I decided it was finally time to do something, and I discovered this paint spray that creates a mirror-like surface. (And in case you haven't noticed, I'm really into spray paint right now.)
I forgot to take pictures of my progress, but you spray the paint on the opposite side of the glass that is going to be the "mirror," and once the several coats have dried, it looks like an old mirror. I sanded the surface and painted it. I decided not to tape -- I scraped instead. I find razoring off the paint to be oddly enjoyable. You probably can't tell, but the window mechanism at the top is spray painted silver, like my kitchen hardware.

Sunday, July 10, 2011
Food Travels
Food Travels!
When I go on vacation I like to take more pictures of my food than anything else. Here are a few pictures of the delicious food I had in Montreal and San Francisco.
Montreal

This is a Sweet Flammekueche. It had banana with vanilla ice cream on it. I wanted it flambeed but I didn't want to pay $2.25 (Canadian Dollars). I contemplated setting it on fire myself.

This is from a cafe in Montreal. I think it was a brie and chicken pesto sandwich. The description was in French so I am not positive. My favorite thing was the tiny little bowls for the pasta salad. They are so cute!

This was my seafood risotto. Again, everything was in French and I am bad at making decisions when menus are in English. I think I had the waiter read the menu to me 10 times, but I think I made the right decision. It was delicious.


When I go on vacation I like to take more pictures of my food than anything else. Here are a few pictures of the delicious food I had in Montreal and San Francisco.
Montreal

This is a Sweet Flammekueche. It had banana with vanilla ice cream on it. I wanted it flambeed but I didn't want to pay $2.25 (Canadian Dollars). I contemplated setting it on fire myself.

This is from a cafe in Montreal. I think it was a brie and chicken pesto sandwich. The description was in French so I am not positive. My favorite thing was the tiny little bowls for the pasta salad. They are so cute!

This was my seafood risotto. Again, everything was in French and I am bad at making decisions when menus are in English. I think I had the waiter read the menu to me 10 times, but I think I made the right decision. It was delicious.


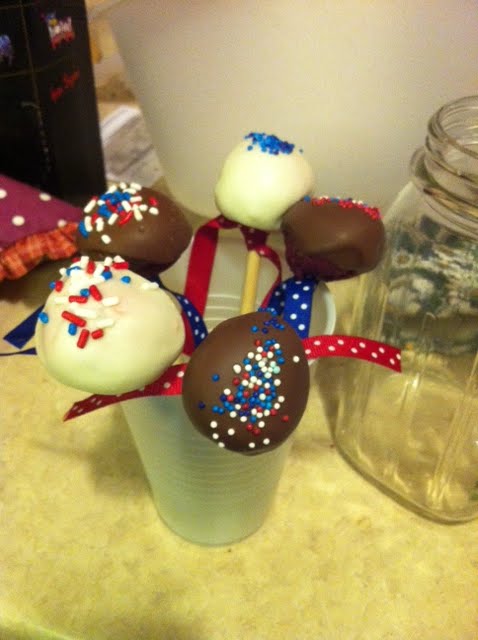
Fourth of July Cake Pops
These tasty little treats are supposedly easy -- but it was not until after one major burn, 10 minutes of tears, 5 hours spent picking out the red, white, and blue and sprinkles out of a rainbow sprinkle jar, and one husband's last minute trip to the grocery store for more chocolate to replace the chocolate I burned later, I finished these things.
These probably took about 10 hours if you include the baking, cooling, and sprinkle selecting.
Ingredients:
Cake,
Icing,
Sticks,
Melting Chocolate (I used melting chips at first, and then I switched to chocolate almond bark)
Sprinkles
Recipe:
Make a cake using the cake recipe of your choice. I used a box cake (Half of them were red velvet, and the other half were strawberry).
After you make the cake, let it cool in the fridge for about an hour.
Then mix in whatever icing you want. I was going to make homemade icing, but instead I bought icing. For the red velvet I mixed in cream cheese icing, and for the strawberry I mixed in rainbow chip.
I mixed in about 3/4 of the jar. The constancy should be pretty doughy.
After you mix it, place the bowl in the fridge for an hour or two.
Then roll the cake into balls, and place in fridge for an hour or two. I would then place the sticks in the dough in the balls, and put back into the fridge for a minute.
Then melt chocolate. This is when Brandon saved the day. My family makes candy every Christmas, and we made truffles for my wedding, yet we can never get chocolate to melt right when we dip stuff in it.
I started with melting chips, and I used the microwave directions. This worked alright for the first three cake pops, but then the chocolate got too clumpy. So the chocolate did not go on smoothly, and it took so long to try it melted the cake pops into blobs.
So at this stage of the game the cake pops were melting everywhere and chocolate was bumpy and ugly.
I decided to reheat the chocolate, which ended up burning the chocolate and burning my hand badly. I then threw a few melted bumpy chocolate balls on the ground in frustration because this was about 8 hours into make cake pop making experience, and I had no more milk chocolate and they looked awful. So, I went to Brandon in tears with my burned hands asking him to buy more chocolate. He went to the store as I pouted on the couch... not one of my finer moments.
I still had not tried the white chocolate, so I got out my double boiler, and melted the white chocolate. I made sure the water did not touch the top pan, and turned the heat to low once it started simmering. You are supposed to take it all the way off the heat, but from previous experience it gets too lumpy with no heat.
I then started to dip the pops into the white chocolate, but it took me too long, so the pops still melted off the stick. At this point Brandon returned with more milk chocolate, and asked if he could try dipping them. Of course, he has no problems dipping the pops, and every pop comes out covered and silky smooth.
I then put the sprinkles on every pop.
----------------------------------------------------
At this point it is appropriate to take a detour, so I can tell you about the 5 hours I spent working on the sprinkles while the cake cooked and cooled. I wanted to make these cake pops Fourth of July appropriate, but I only found a small jar of red, white, and blue cylinder shaped sprinkles. I really wanted the tiny ball sprinkles, but I could only find rainbow. I thought, "Hey, it will take no time to pick out the red, white, and blue ones." FAMOUS LAS T WORDS! Brandon walked in after I had tried picking out the correct colors with a tweezers for an hour, and I had about 10 sprinkles of each color. He returned 4 hours later, and I was still sitting on the couch sorting the colors. I finally, quit after he laughed at me and I realized I only had enough for maybe 15 cake pops. I should never have tried this, but once I started sorting the sprinkles, I felt pot committed... or make sprinkle committed. :) I think without this step, these cake pops would not have taken me all day.
----------------------------------------------------
Back to the dipping in chocolate stage. I placed the cake pops on Styrofoam to cool, but noticed the were slipping down the stick. We lost about 5 pop sticks in this process, and I was worried we would lose our labor of love. We have no AC and the kitchen was hot, so I started putting the Styrofoam tray in the fridge to let them cool, right after I got the sprinkles on them. This fixed the problem.

After they cooled, I tied an appropriately colored bow on the sticks to up the cuteness factor.
They are pretty rich, so I was worried they would be too sweet, but luckily everyone loved them.
What I learned from this process.
1. It is hard to make food cute... These things started to feel like a craft.
2. From this point on, Brandon will always dip things in chocolate. (I am making chocolate wands for my Harry Potter party this week, and Brandon may have to stay home from work to help).
3. Do NOT ever sort sprinkles.
4. It is easier to make cake balls over cake sticks... don't have to worry about getting them to stay on the stick)
Oh, and please comment about how you really like the cake pops with the ball shaped sprinkles over the regular sprinkles. :)

These probably took about 10 hours if you include the baking, cooling, and sprinkle selecting.
Ingredients:

Cake,
Icing,
Sticks,
Melting Chocolate (I used melting chips at first, and then I switched to chocolate almond bark)
Sprinkles
Recipe:
Make a cake using the cake recipe of your choice. I used a box cake (Half of them were red velvet, and the other half were strawberry).
After you make the cake, let it cool in the fridge for about an hour.
Then mix in whatever icing you want. I was going to make homemade icing, but instead I bought icing. For the red velvet I mixed in cream cheese icing, and for the strawberry I mixed in rainbow chip.
I mixed in about 3/4 of the jar. The constancy should be pretty doughy.
After you mix it, place the bowl in the fridge for an hour or two.
Then roll the cake into balls, and place in fridge for an hour or two. I would then place the sticks in the dough in the balls, and put back into the fridge for a minute.
Then melt chocolate. This is when Brandon saved the day. My family makes candy every Christmas, and we made truffles for my wedding, yet we can never get chocolate to melt right when we dip stuff in it.
I started with melting chips, and I used the microwave directions. This worked alright for the first three cake pops, but then the chocolate got too clumpy. So the chocolate did not go on smoothly, and it took so long to try it melted the cake pops into blobs.
So at this stage of the game the cake pops were melting everywhere and chocolate was bumpy and ugly.
I decided to reheat the chocolate, which ended up burning the chocolate and burning my hand badly. I then threw a few melted bumpy chocolate balls on the ground in frustration because this was about 8 hours into make cake pop making experience, and I had no more milk chocolate and they looked awful. So, I went to Brandon in tears with my burned hands asking him to buy more chocolate. He went to the store as I pouted on the couch... not one of my finer moments.
I still had not tried the white chocolate, so I got out my double boiler, and melted the white chocolate. I made sure the water did not touch the top pan, and turned the heat to low once it started simmering. You are supposed to take it all the way off the heat, but from previous experience it gets too lumpy with no heat.
I then started to dip the pops into the white chocolate, but it took me too long, so the pops still melted off the stick. At this point Brandon returned with more milk chocolate, and asked if he could try dipping them. Of course, he has no problems dipping the pops, and every pop comes out covered and silky smooth.
I then put the sprinkles on every pop.
----------------------------------------------------
At this point it is appropriate to take a detour, so I can tell you about the 5 hours I spent working on the sprinkles while the cake cooked and cooled. I wanted to make these cake pops Fourth of July appropriate, but I only found a small jar of red, white, and blue cylinder shaped sprinkles. I really wanted the tiny ball sprinkles, but I could only find rainbow. I thought, "Hey, it will take no time to pick out the red, white, and blue ones." FAMOUS LAS
 T WORDS! Brandon walked in after I had tried picking out the correct colors with a tweezers for an hour, and I had about 10 sprinkles of each color. He returned 4 hours later, and I was still sitting on the couch sorting the colors. I finally, quit after he laughed at me and I realized I only had enough for maybe 15 cake pops. I should never have tried this, but once I started sorting the sprinkles, I felt pot committed... or make sprinkle committed. :) I think without this step, these cake pops would not have taken me all day.
----------------------------------------------------
Back to the dipping in chocolate stage. I placed the cake pops on Styrofoam to cool, but noticed the were slipping down the stick. We lost about 5 pop sticks in this process, and I was worried we would lose our labor of love. We have no AC and the kitchen was hot, so I started putting the Styrofoam tray in the fridge to let them cool, right after I got the sprinkles on them. This fixed the problem.

After they cooled, I tied an appropriately colored bow on the sticks to up the cuteness factor.
They are pretty rich, so I was worried they would be too sweet, but luckily everyone loved them.
What I learned from this process.
1. It is hard to make food cute... These things started to feel like a craft.
2. From this point on, Brandon will always dip things in chocolate. (I am making chocolate wands for my Harry Potter party this week, and Brandon may have to stay home from work to help).
3. Do NOT ever
 sort sprinkles.
4. It is easier to make cake balls over cake sticks... don't have to worry about getting them to stay on the stick)
Oh, and please comment about how you really like the cake pops with the ball shaped sprinkles over the regular sprinkles. :)

My Only Attempt at Crafts

I hope your past year has not been too hard without the joys of my posting! To restart my hugely successful blogging career I am posting my only attempt at crafts you will see from me in years. :) For most people gluing rope on a jar doesn't count as a craft, but for me this is going all out.
So to make these beautiful things glue twine on a jar. :)
Sunday, June 26, 2011
Kitchen Before-and-After
As most of you know, I love a red kitchen. And I really do like the red I chose for my kitchen. Unfortunately, it's really for some other kitchen. Some larger, more airy kitchen. I think it would be a definite fail if I had painted the cabinets the color I intended. As it is, I think the white off-sets some of the darkness. It's still a little dark for the kitchen, but it's OK. I think I'm going to get some rope lights and put them on top of cabinets to cast more light on the red.


Kitchen Cabinets
I have repainted my kitchen a vaguely questionable color. I'll post pictures of the whole thing in a second, but I thought I'd focus on the cabinets first. They are super cheap cabinets that are a mix of wood (a small mix), paneling, and particle board.

I meant to paint them off-white, but the store failed to actually tint my paint. Being the bright creature that I am, I didn't notice until half way through the second coat. But it actually worked out -- I think it makes my questionable wall color slightly (though not entirely) less questionable.
However, because of the paneling and particle board, I first had to paint it with a primer. I used Zissner, which is the same stuff I used on The Thing. Below is what they looked like after the primer.

The hardware on my cabinets was also atrocious. The collection in the tupperware is the original stuff. The stainless steel on the left is what I contemplated changing it to, but that nonsense costs money. Kind of a lot, even for something relatively cheap. Those suckers add up. So then I tried using the spray paint that we used on my lighting, but I didn't really like it.

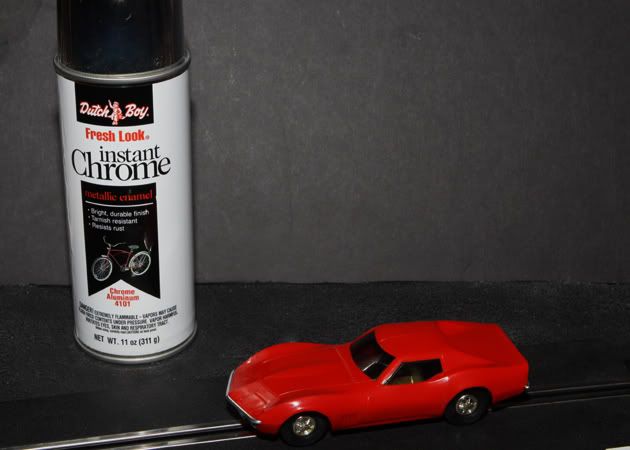
Well, then I saw this instant chrome stuff (below was the only picture online I could find), and I thought to myself, man, that is klassy. So, naturally, I got it.

First, I lined them up and primed them all.


Of course, I was a total doofus and I didn't protect my hands, so I had these zombie fingers. Very clever, Reavis.

Then I used my brain piece and put on gloves.

Then it was time for the chrome. It dried really fast -- almost immediately, in fact. No doubt lots of cancer-causing chemicals responsible for that.

So, anyways, this is what I ended up with. It's far from ideal, but it's free. I'm willing to live with a lot when it's free. But I want to know what you think! Is it just ticky, totally tacky, or full-blown ticky tacky? Let me know, because after the picture is the first ever Gracewood Eats poll. Answer it!


I meant to paint them off-white, but the store failed to actually tint my paint. Being the bright creature that I am, I didn't notice until half way through the second coat. But it actually worked out -- I think it makes my questionable wall color slightly (though not entirely) less questionable.
However, because of the paneling and particle board, I first had to paint it with a primer. I used Zissner, which is the same stuff I used on The Thing. Below is what they looked like after the primer.

The hardware on my cabinets was also atrocious. The collection in the tupperware is the original stuff. The stainless steel on the left is what I contemplated changing it to, but that nonsense costs money. Kind of a lot, even for something relatively cheap. Those suckers add up. So then I tried using the spray paint that we used on my lighting, but I didn't really like it.

Well, then I saw this instant chrome stuff (below was the only picture online I could find), and I thought to myself, man, that is klassy. So, naturally, I got it.
First, I lined them up and primed them all.


Of course, I was a total doofus and I didn't protect my hands, so I had these zombie fingers. Very clever, Reavis.

Then I used my brain piece and put on gloves.

Aces!
Then it was time for the chrome. It dried really fast -- almost immediately, in fact. No doubt lots of cancer-causing chemicals responsible for that.

Shiny!
So, anyways, this is what I ended up with. It's far from ideal, but it's free. I'm willing to live with a lot when it's free. But I want to know what you think! Is it just ticky, totally tacky, or full-blown ticky tacky? Let me know, because after the picture is the first ever Gracewood Eats poll. Answer it!

Subscribe to:
Posts (Atom)